Top Ad 728x90

Saturday, November 30, 2024

Meat and Potato Casserole

by


 Originating from Farley, Iowa, this Meat and Potato Casserole is a delightful dish introduced by Marna Heitz. While its original version uses cream of celery soup, you can experiment with other cream soups, such as mushroom. However, for a first-time taste, stick to the classic recipe below.

Course: Main CourseCuisine: AmericanKeyword: Meat and Potato Casserole Prep Time: 10minutes minsCook Time: 50minutes minsTotal Time: 1hour hr

Ingredients

Potatoes thinly sliced and peeled – 4 cups

Melted butter 2 tablespoons

Salt 1/2 teaspoon

Ground beef 1 pound

Frozen corn 10 ounces

Condensed cream of celery soup undiluted – 10-3/4 ounces

milk 2% – 1/3 cup

Garlic powder – 1/4 teaspoon

Pepper – 1/8 teaspoon

onion Chopped – 1 tablespoon

Cheddar cheese shredded – 1 cup (set aside half for topping)

Fresh parsley minced – optional for garnish

Instructions

Preheat your oven to 400°F. In a mixing bowl, combine the sliced potatoes, melted butter, and salt. Layer this mixture at the base and along the sides of a 13×9 inch baking dish. Bake for 25-30 minutes, or until the potatoes are nearly tender.

As the potatoes bake, brown the ground beef in a skillet over medium heat. Once cooked through, drain any excess fat. Evenly layer the beef and corn over the baked potatoes. In a separate bowl, mix together the cream soup, milk, garlic powder, pepper, onion, and half of the shredded cheese. Pour this mixture over the beef.

Return to the oven and bake, uncovered, for an additional 20 minutes, or until the casserole has heated through and the veggies are tender. For a golden finish, sprinkle the remaining cheese on top and bake for an extra 2-3 minutes. Garnish with minced parsley, if you prefer.

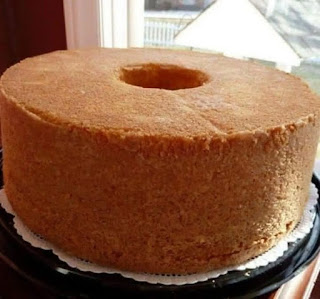
FAMOUS POUND CAKE

by


 Ingredients

1 box Duncan Hines butter recipe cake mix

1 cupcake flour

1 cup sugar

1 cup sour cream, room temperature

1 stick butter, room temperature

5 Eggs, room temperature

1/4 cup oil

1/4 cup water

1 teaspoon vanilla extract

1 teaspoon butter flavouring

1 teaspoon almond extract


How To Make FAMOUS POUND CAKE


Step 1: Prepare the oven. Preheat it to 350 degrees.


Step 2: With Baker’s Joy, generously grease a tube bundt pan.


Step 3: Combine the cake ingredients (cake mix, cake flour, sugar, sour cream, butter, eggs, oil, water, vanilla extract, butter flavouring, and almond extract) until smooth, making sure not to overmix.


Step 4: Into the prepared pan, pour the batter and place in the preheated oven. Bake for about 55 to 65 minutes until a fork or toothpick inserted in the centre of the cake comes out clean. Remove from the oven and let the cake cool for at least 10 to 15 minutes before inverting to a serving dish.


Step 5: In the meantime, whisk the powdered sugar and lemon juice to your desired texture. Since it is only a glaze, the consistency should be like thick nectar.


Step 6: A little at a time, pour the glaze over the cake and spread using the back of a spoon. This way the glaze will soak into the still-warm cake.


Step 7: Slice and serve warm or room temperature. Enjoy!

Strawberry Cream Cheese Icebox Cake Recipe

by


 Whether you’re hosting guests over for a baby shower, kids’ party, or birthday dinner, if you’re in the mood for a surprise everyone will love, try these delicious bites! Your guests will have nothing but good words for these small, creamy sweets covered with dark chocolate.


The secret of this texture that melts in your mouth? A mixture of cream cheese and strawberry ice cream that has been whipped with an electric mixer. And with the addition of graham cracker crumbs and succulent fresh strawberries, you receive a mouth-watering combination of flavors and textures!


The recipe makes about 64 bites (if you cut the bites into small cubes). And since you will only need 5 ingredients, this is an easy and economical way to wow your guests!


INGREDIENTS

Crust


1 1/2 cups graham cracker crumbs

1/4 cup melted butter

2 tbsp. tablespoon of sugar

Frozen cheese base


8 oz Canadian cream cheese, softened

1/2 cup of sugar

8 cups of strawberry ice cream

Strawberry mint garnish


2 cups cubed fresh strawberries

1/4 cup chopped fresh mint

1/4 cup maple syrup

PREPARATION


In a large bowl, combine all the ingredients for the crust. Press the crust into a springform pan and freeze for 30 minutes.

In mixing bowl, cream cream cheese with sugar, beat for 2 minutes or until sugar has dissolved. Gradually add the strawberry ice cream and mix well. Spread the preparation evenly over the crust. Freeze for 3 hours.

To prepare the filling, combine the strawberries with the maple syrup, mint and pepper in a saucepan. Cook over low heat for 5 minutes. Remove from heat and let cool.


Unmould the iced cake, serve in wedges with the strawberry mint filling

Creamy Caramel Cheesecake Delight

by


 Indulge in the luscious layers of this Creamy Caramel Cheesecake. This dessert perfectly balances a buttery graham cracker crust, a rich and smooth cheesecake filling, and a sweet caramel topping. This irresistible treat is ideal for any occasion, offering a melt-in-your-mouth experience with everyone returning for seconds. Whether you’re a seasoned baker or just starting, this recipe is easy to follow and guarantees a spectacular result.


Recipe:


Ingredients

For the crust:


1 ½ cups graham cracker crumbs

¼ cup granulated sugar

½ cup unsalted butter, melted

For the cheesecake filling:


3 (8 oz) packages of cream cheese, softened

1 cup granulated sugar

3 large eggs

1 teaspoon vanilla extract

½ cup sour cream

For the caramel topping:


1 cup granulated sugar

¼ cup water

½ cup heavy cream warmed

2 tablespoons unsalted butter

Pinch of salt

Instructions


Prepare the crust:

Preheat your oven to 325°F (163°C).

In a mixing bowl, combine the graham cracker crumbs, sugar, and melted butter. Press the mixture evenly into the bottom of a springform pan. Bake for 10 minutes and let cool.

Make the cheesecake filling:

In a large mixing bowl, beat the cream cheese and sugar until smooth.

Add eggs one at a time, mixing well after each addition.

Mix in vanilla extract and sour cream until fully incorporated. Pour the filling over the cooled crust.

Bake the cheesecake:

Place the springform pan in a larger baking dish and fill the dish with hot water (about halfway up the sides of the pan). This water bath helps prevent cracks.

Bake for 60-70 minutes, or until the center is just set but still slightly jiggly. Turn off the oven and let the cheesecake cool inside with the door slightly ajar for 1 hour.

Prepare the caramel topping:

In a saucepan, combine sugar and water over medium heat. Stir until the sugar dissolves, then stop stirring and let the mixture boil until it turns a deep amber color.

Carefully add the warm heavy cream while stirring, followed by the butter and salt. Allow to cool slightly.

Assemble and chill:

Pour the caramel sauce over the cooled cheesecake and sprinkle some crumbs or garnish if desired. Refrigerate for at least 4 hours or overnight before serving.

Enjoy your homemade creamy caramel cheesecake!

Keep this recipe well because it’s like a treasure on earth!

by


 Ingredients:

2 packets of passionfruit gelatin

500 ml of hot water

1 packet of passionfruit-flavored powdered juice concentrate

1 carton of sweetened condensed milk

1 carton of heavy cream

1/2 cup of powdered milk


Instructions:


Dissolve the gelatin in the hot water in a bowl.

Add the powdered juice, sweetened condensed milk, heavy cream, and powdered milk.

Whisk well with a whisk until the mixture is smooth.

Pour the mixture into a dish and refrigerate for about 2 hours, or until firm.

Take it out of the fridge and serve.


Tips:


For a creamier consistency, blend the mixture in a blender.

You can add fresh fruit to the pudding, like chunks of passionfruit or strawberries.

Serve the pudding with caramel syrup or whipped cream.


How to Turn an Ordinary Recipe into a Healthy and Nutritious One?


Turning an ordinary recipe into a healthy one might seem like a challenge, but there are some simple substitutions you can make to make your recipes healthier and more nutritious.


One of the first things you can do is replace white flour with whole wheat flour or oats. These flours have more fiber and nutrients than white flour, which makes them healthier and more filling.


If the recipe calls for whole milk, you can substitute it with skim milk or almond milk. Whole milk has more fat and calories than skim milk, and almond milk is a lactose-free option for those who are intolerant.


Another simple substitution is replacing sugar with natural sweeteners like honey or brown sugar. These sweeteners are healthier than refined white sugar because they contain more nutrients and have a lower glycemic index.


If the recipe calls for oil or butter, you can substitute them with coconut oil or olive oil. These oils are healthier and contain good fats for the body.


For recipes that contain gluten, you can use rice flour, almond flour, or chickpea flour. These flours are gluten-free alternatives and can replace wheat flour in many recipes.


Lastly, adding more vegetables and fruit to a recipe can make it healthier and more nutritious. Try adding more vegetables to soups and stews, and add fresh fruit to desserts or smoothies.


Remember, making small changes to your favorite recipe can make it healthier and more nutritious. Try these simple substitutions to enjoy a healthy and tasty meal.

Coconut cake

by


 Ingredients:

1 (15 1/4-ounce) can crushed pineapple in juice, undrained

1 1/2 cups butter or margarine, softened

3 cups sugar

5 large eggs

1/2 cup lemon-lime soft drink

3 cups cake flour, sifted

1 teaspoon lemon extract

1 teaspoon vanilla extract

Pineapple Filling

Cream Cheese Frosting:

1 (6-ounce) package frozen flaked coconut, thawed

Garnish: fresh mint sprig


Instructions:


Grease bottom and sides of 3 (9-inch) round cakepans; line bottoms with wax paper. Grease and flour wax paper.

Drain pineapple, reserving 3/4 cup juice. Remove 1/4 cup reserved juice for Cream Cheese Frosting, and reserve crushed pineapple for Pineapple Filling.

Beat butter at medium speed with an electric mixer until creamy; gradually add sugar, beating well. Add eggs, 1 at a time, beating until blended after each addition.

Combine 1/2 cup reserved pineapple juice and soft drink. Add flour to butter mixture alternately with juice mixture, beginning and ending with flour. Beat at low speed until blended after each addition. Stir in extracts. Pour into prepared cakepans.

Bake at 350° for 25 to 30 minutes or until a wooden pick inserted in center comes out clean. Remove from pans immediately; cool on wire racks.

Spread 3/4 cup Pineapple Filling between cake layers and remaining filling on top of cake. Spread Cream Cheese Frosting on sides of cake; pipe border around top, if desired. Sprinkle with coconut. Garnish, if desired.

For lemon-lime soft drink, we used 7-Up. Its specific level of carbonation makes the layers rise beautifully.

Enjoy

Friday, November 29, 2024

Smoked Chicken Wings

by


 Introduction

Smoked chicken wings offer a flavorful, tender alternative to traditional fried wings, providing a perfect balance of smoky aroma, crispy skin, and juicy meat. These wings are ideal for barbecues, casual gatherings, or any occasion that calls for an indulgent yet healthier option. Smoking enhances the chicken with deep, savory flavors while keeping it moist and tender inside. Whether you’re a seasoned pitmaster or a beginner, smoked chicken wings are a crowd-pleasing, easy-to-make dish that’s bound to impress.


### Origin and Cultural Significance

The practice of smoking meats dates back centuries and spans various cultures. In the United States, smoking meats has roots in Native American and early settler traditions, particularly in the southern states where barbecuing and smoking became synonymous with local cuisine. While chicken wings, specifically, became popular in Buffalo, New York, during the 1960s, the method of smoking chicken itself is part of a broader tradition of low-and-slow cooking found in barbecue cultures around the world, from Texas brisket to Brazilian churrasco.


### Ingredients Quantity

For about 2 servings (roughly 10 wings):


– 10 chicken wings (whole, separated into flats and drumettes)

– 2 tbsp olive oil (for coating)

– 1 tbsp brown sugar (optional, for a touch of sweetness)


#### For the dry rub:

– 1 tbsp paprika

– 1 tsp garlic powder

– 1 tsp onion powder

– 1 tsp ground black pepper

– 1 tsp salt

– 1/2 tsp chili powder (for mild heat)

– 1/2 tsp smoked paprika (for extra smokiness)

– 1/2 tsp cumin (optional, for an earthy flavor)


#### For the brine (optional):

– 2 cups water

– 1/4 cup kosher salt

– 1 tbsp sugar

– 1 tbsp apple cider vinegar


### Optional Additions

– Hot sauce or barbecue sauce (for dipping or glazing)

– Fresh herbs (such as cilantro or parsley) for garnish

– Lemon zest or lime for a tangy kick

– A sprinkle of sesame seeds for texture and flair


### Tips for Success

1. **Use a reliable smoker**: If you have access to a wood smoker or charcoal grill, it will impart the best smoky flavor. For quicker results, a gas grill with wood chips can work as well.

2. **Brine the wings**: Brining the chicken wings before smoking helps retain moisture and results in a juicier texture.

3. **Patience is key**: Smoking takes time. Aim for a slow cook over low heat (225-250°F) for around 1.5 to 2 hours for perfectly cooked wings.

4. **Monitor internal temperature**: The wings are done when they reach an internal temperature of 165°F (74°C).

5. **Crisp the skin**: After smoking, if you want extra crispy skin, place the wings under a broiler for 2-3 minutes or return them to the grill over direct heat for a few minutes.


### Instructions

1. **Prepare the wings**: If you’re brining, combine the water, salt, sugar, and apple cider vinegar in a bowl. Submerge the wings and refrigerate for at least 1 hour (up to 4 hours). Drain and pat dry before cooking.

2. **Apply the rub**: In a small bowl, mix all the dry rub ingredients. Coat the wings evenly with olive oil, then rub the spice mix all over the chicken wings. Let them sit for 15-20 minutes to allow the flavors to meld.

3. **Set up your smoker or grill**: Preheat your smoker or grill to 225-250°F (107-121°C). Add your choice of wood chips (hickory, applewood, or cherry are great options for chicken) to create the smoke.

4. **Smoke the wings**: Arrange the wings on the smoker or grill, ensuring they’re not crowded. Close the lid and smoke for 1.5 to 2 hours, checking every 30 minutes. Add more wood chips if needed.

5. **Finish the wings**: Once the wings reach an internal temperature of 165°F (74°C), remove them from the smoker. If you want crispier skin, broil or grill for an additional 2-3 minutes.

6. **Serve**: Toss with your favorite hot sauce or glaze, and garnish with fresh herbs if desired. Serve immediately.


### Description

Smoked chicken wings are a savory, smoky delicacy, boasting an irresistible flavor profile that combines the richness of the chicken with the aromatic depth of the smoke. The dry rub adds a zesty and slightly spicy kick, while the slow-smoking process ensures tender, juicy meat inside with crispy skin. These wings are perfect for a casual meal or special gathering, offering a healthier alternative to fried wings but with no compromise on taste.


### Nutritional Information (per serving, based on 10 wings)

– **Calories**: 400 kcal

– **Protein**: 30g

– **Fat**: 30g

– Saturated fat: 7g

– **Carbohydrates**: 3g

– Fiber: 1g

– Sugars: 1g

– **Cholesterol**: 90mg

– **Sodium**: 500mg

– **Vitamin A**: 15% of daily value

– **Vitamin C**: 2% of daily value

– **Calcium**: 2% of daily value

– **Iron**: 8% of daily value


### Conclusion

Smoked chicken wings provide an elevated twist on the classic wing experience. With the right balance of seasoning, technique, and patience, you can create wings that are smoky, tender, and perfectly crispy. Whether you’re preparing them for a casual dinner or impressing guests at a party, these wings are sure to satisfy any craving for bold flavor.


### Recommendation

If you’re looking for a healthier and more flavorful alternative to fried wings, smoked chicken wings should be your go-to choice. The smoky flavor and tender texture make them a crowd favorite, while the option to customize with different rubs and sauces ensures you’ll never get bored. Pair them with fresh vegetables or a light salad for a balanced meal or serve with your favorite sides for a delicious and indulgent treat.

Love making these and giving them out as gifts! Best part? No baking required

by


 Lemon truffles are a dessert that combines the perfect balance of creamy sweetness and zesty tanginess. Whether you’re looking for a quick treat to share, a gift-worthy confection, or a dessert to savor on your own, these delightful lemon truffles are a must-try! Here’s a simple recipe to make these vibrant, melt-in-your-mouth treats.


Ingredients

For the Truffle Mixture:

1 cup white chocolate chips

1/4 cup heavy cream

2 tablespoons salted butter

2 teaspoons fresh lemon juice

Zest of 2 lemons

2 cups powdered sugar

Yellow food coloring (optional)

For Coating:

Additional powdered sugar for dusting

Instructions

1️⃣ Prepare the Base

Melt the Chocolate & Butter:

Place the white chocolate chips and butter in a heatproof bowl. Set aside.

Heat the Cream:

In a small saucepan, heat the heavy cream over medium heat until it just begins to boil. Remove from heat immediately.

Combine Ingredients:

Pour the hot cream over the white chocolate and butter. Stir until the chocolate and butter are completely melted and the mixture is smooth and creamy.

2️⃣ Add Lemon Flavor

Incorporate Lemon:

Stir in the lemon juice and zest, ensuring everything is well combined.

Add Powdered Sugar:

Gradually sift and mix in the powdered sugar until the mixture thickens into a soft dough-like consistency. For a pop of color, add a few drops of yellow food coloring.

3️⃣ Chill and Shape

Chill the Mixture:

Transfer the bowl to the refrigerator and chill for at least 2 hours or until firm enough to handle.

Shape into Truffles:

Using a spoon or melon baller, scoop the chilled mixture and roll it into bite-sized balls between your palms.

Dust with Powdered Sugar:

Roll each truffle in powdered sugar to coat evenly, giving them a delicate finish.

4️⃣ Final Touches

Set the Truffles:

Arrange the truffles on a baking sheet and refrigerate for an additional 30 minutes to firm up.

Serve and Enjoy:

These truffles are best served chilled or at room temperature. Garnish with extra lemon zest for a touch of elegance.

Serving Suggestions

As a Treat: Serve alongside tea or coffee for a delightful afternoon snack.

For Gifting: Package in decorative boxes or jars with a ribbon for a thoughtful homemade gift.

For Special Occasions: Pair with whipped cream or lemon sorbet for an indulgent dessert experience.

Tips for the Perfect Lemon Truffles

Adjust the Zest: Add more or less lemon zest depending on how tangy you like your truffles.

Double the Recipe: These truffles disappear fast, so consider making a double batch for larger gatherings!

Storage: Store in an airtight container in the fridge for up to 1 week or freeze for up to 1 month.

Variations: Coat the truffles in shredded coconut, white chocolate drizzle, or crushed cookies for extra flair.

Why You’ll Love These Lemon Truffles

Quick and Easy: Minimal prep and straightforward steps.

Customizable: Adjust the flavor and coating to suit your taste.

Versatile: Perfect for parties, gifts, or personal indulgence.

Nutritional Information (Per Truffle)

Calories: ~110 kcal

Carbohydrates: ~15g

Fat: ~6g

Protein: ~1g

Sugar: ~12g

These Lemon Truffles bring a bright burst of flavor and a creamy texture that melts in your mouth. They’re the perfect blend of simplicity and elegance—sure to impress anyone who tries them. So roll up your sleeves, unleash your inner pastry chef, and enjoy making these delightful little bites of sunshine

Gar lic Butter Lobster Tail with Seared Scallops

by


 Indulge in a restaurant-quality dish with this elegant pairing of tender lobster tail and perfectly seared scallops. This recipe combines rich garlic butter, fresh herbs, and a touch of lemon for a delightful seafood experience. Perfect for special occasions or when you want to treat yourself to a luxurious meal.


Recipe:

Ingredients:

For the lobster tail:


2 lobster tails (6–8 ounces each)

4 tablespoons unsalted butter, melted

2 cloves garlic, minced

1 tablespoon fresh parsley, chopped

1/2 teaspoon paprika

1 tablespoon lemon juice

For the scallops:


8 large sea scallops

2 tablespoons olive oil

2 tablespoons unsalted butter

1 clove garlic, minced

Salt and pepper, to taste

Fresh parsley, chopped (for garnish)

Instructions:

Step 1: Prepare the Lobster Tail


Preheat your oven to 425°F (220°C) or set the broiler to high.

Using kitchen scissors, cut down the middle of the lobster tail shell, stopping before the tail fin. Gently loosen the meat and lift it over the shell for a butterfly effect.

Mix melted butter, garlic, parsley, paprika, and lemon juice. Brush this mixture generously over the lobster meat.

Place the lobster tails on a baking sheet. Broil or bake for 8–10 minutes, or until the meat is opaque and tender.

Step 2: Prepare the Scallops


Pat the scallops dry with paper towels and season both sides with salt and pepper.

Heat olive oil in a large skillet over medium-high heat until shimmering.

Add scallops to the skillet, leaving space between each one. Sear for 2–3 minutes per side, or until a golden crust forms. Remove from the skillet and set aside.

Reduce heat to medium, add butter and garlic to the skillet, and cook for 1 minute. Drizzle this garlic butter over the scallops.

Step 3: Plate and Serve


Arrange the lobster tail and scallops on a plate. Garnish with fresh parsley and serve with lemon wedges for an extra burst of freshness.

Tips:

For extra richness, drizzle any leftover garlic butter over the scallops and lobster before serving.

Pair with a side of creamy mashed potatoes, steamed asparagus, or a fresh salad for a complete meal.

Elevate your dining experience with this decadent seafood dish that’s as delicious as it is beautiful!

Caramel-Glazed Carrot Cake with Cream Cheese Frosting

by


 This decadent carrot cake is a true showstopper, combining the moist and spiced flavors of a classic carrot cake with a rich caramel glaze and a tangy cream cheese frosting. Perfect for special occasions, this dessert is guaranteed to impress with its luscious layers and irresistible sweetness.

Ingredients:

For the Cake:
2 cups grated carrots
1 3/4 cups all-purpose flour
1 1/2 tsp baking powder
1 tsp baking soda
1 tsp ground cinnamon
1/2 tsp ground nutmeg
1/2 tsp salt
1 cup granulated sugar
1/2 cup brown sugar
3/4 cup vegetable oil
3 large eggs
1 tsp vanilla extract
1/2 cup crushed pineapple, drained
1/2 cup chopped walnuts (optional)
For the Cream Cheese Frosting:

200 g cream cheese, softened
1/2 cup unsalted butter, softened
2 cups powdered sugar
1 tsp vanilla extract
For the Caramel Glaze:
1/2 cup granulated sugar
1/4 cup unsalted butter
1/4 cup heavy cream
1/2 tsp vanilla extract

Instructions:

Prepare the Cake:

Preheat your oven to 175°C (350°F) and grease a 9-inch round cake pan. Line the bottom with parchment paper.

In a large bowl, whisk together the flour, baking powder, baking soda, cinnamon, nutmeg, and salt.

In another bowl, beat the granulated sugar, brown sugar, and oil until well combined.

 Add eggs one at a time, followed by the vanilla extract.

Gradually fold the dry ingredients into the wet mixture. Mix until just combined.

Gently fold in the grated carrots, crushed pineapple, and walnuts (if using).

Pour the batter into the prepared pan and bake for 35–40 minutes or until a toothpick inserted in the center comes out clean.

Allow the cake to cool in the pan for 10 minutes, then transfer to a wire rack to cool completely.

Make the Cream Cheese Frosting:

Beat the cream cheese and butter together until smooth and creamy.

Gradually add powdered sugar and vanilla extract, beating until fluffy.

Prepare the Caramel Glaze:

In a saucepan over medium heat, melt the sugar until golden brown, stirring constantly.

Add the butter and stir until fully incorporated.

Slowly pour in the cream while stirring, and let the mixture simmer for 1–2 minutes.

Remove from heat and stir in the vanilla extract. Allow to cool slightly.

Assemble the Cake:

Spread an even layer of cream cheese frosting over the cooled cake.
Drizzle the caramel glaze generously over the top, letting it drip down the sides for an elegant look.

Optional: Garnish with crushed nuts or a light sprinkle of cinnamon.
Serve this caramel-glazed carrot cake with a hot cup of coffee or tea and watch it disappear slice by slice. Enjoy!

Thursday, November 28, 2024

Butternut Cookies Recipe

by


 Introduction:


These Pecan-Glazed Creamy Vanilla Cookies are the perfect bite-sized treats for any occasion. Soft, buttery cookies are coated in a rich vanilla glaze and topped with crunchy pecans for a delightful combination of textures and flavors. Whether for a holiday dessert spread or an afternoon snack, these cookies are sure to impress!


Recipe: Pecan-Glazed Creamy Vanilla Cookies


Ingredients:

For the Cookies:


1 cup unsalted butter, softened

1/2 cup powdered sugar

1 tsp vanilla extract

2 cups all-purpose flour

1/2 tsp salt

1/2 cup chopped pecans (optional)

For the Glaze:


2 cups powdered sugar

3–4 tbsp milk (or heavy cream for a richer glaze)

1 tsp vanilla extract

Topping:


1/2 cup chopped pecans, toasted

Instructions:

Make the Cookies:

Preheat your oven to 350°F (175°C). Line a baking sheet with parchment paper.

In a large bowl, cream together the butter and powdered sugar until light and fluffy. Mix in the vanilla extract.

Gradually add the flour and salt, mixing until a soft dough forms. Stir in chopped pecans if desired.

Roll the dough into 1-inch balls and place them on the prepared baking sheet, about 2 inches apart.

Bake for 12–15 minutes, or until the cookies are set and the bottoms are lightly golden. Remove from oven and let cool completely.

Prepare the Glaze:

In a medium bowl, whisk together powdered sugar, milk, and vanilla extract until smooth. Adjust the consistency by adding more milk for a thinner glaze or more powdered sugar for a thicker glaze.

Decorate the Cookies:

Dip the top of each cooled cookie into the glaze, letting any excess drip off. Place the cookies on a wire rack or parchment paper.

While the glaze is still wet, sprinkle toasted chopped pecans over the top.

Set and Serve:

Allow the glaze to set completely before serving or storing. Store cookies in an airtight container for up to 5 days.

Serving Suggestions:


Serve these cookies with a warm cup of coffee, tea, or milk for a truly comforting treat. They also make a great gift when wrapped in festive packaging!

Wednesday, November 27, 2024

Festive Fruit Cake Bars

by


 Introduction:


If you’re looking for a delightful and colorful dessert to share during holidays or special occasions, these Festive Fruit Cake Bars are the perfect treat! Packed with candied fruits and a rich, creamy batter, they blend tradition with convenience. Whether you’re a seasoned baker or just starting, this simple recipe will make your baking experience fun and rewarding. Perfect for gifting or enjoying with family, these bars are sure to bring a smile to everyone’s face.


Recipe for Festive Fruit Cake Bars


Ingredients:

2 cups all-purpose flour

1/2 teaspoon baking powder

1/4 teaspoon salt

1 cup unsalted butter (softened)

1 cup granulated sugar

2 large eggs

1 teaspoon vanilla extract

1/2 cup milk

1 cup candied fruits (chopped)

1/2 cup chopped nuts (optional)

Instructions:

Preheat the Oven

Preheat your oven to 350°F (175°C). Line a rectangular baking pan with parchment paper, leaving extra over the edges for easy removal.

Prepare the Dry Ingredients

In a medium bowl, whisk together the flour, baking powder, and salt. Set aside.

Cream the Butter and Sugar

In a large mixing bowl, use a hand or stand mixer to cream the softened butter and sugar until light and fluffy, about 2-3 minutes.

Add Wet Ingredients

Beat in the eggs, one at a time, followed by the vanilla extract. Mix until well combined.

Incorporate Milk and Dry Ingredients

Gradually add the dry ingredients to the wet mixture, alternating with the milk. Begin and end with the dry ingredients. Mix just until combined—don’t overmix.

Fold in Add-Ins

Gently fold in the chopped candied fruits and nuts (if using) until evenly distributed.

Pour into the Pan

Pour the batter into the prepared baking pan, spreading it evenly with a spatula.

Bake

Bake in the preheated oven for 30-35 minutes or until a toothpick inserted into the center comes out clean.

Cool and Serve

Allow the cake to cool completely in the pan. Use the parchment paper edges to lift it out, then slice it into bars. Serve and enjoy!

These fruit cake bars are best stored in an airtight container at room temperature and can last up to a week. Share them with loved ones, or savor them all yourself!


Slow Cooker Pot Roast

by


 Ingredients

1 (4 pound) beef roast (such as chuck, eye of round, etc.)

salt and pepper to taste

1 onion, sliced

4 cloves garlic, chopped

1 tablespoon fresh rosemary, chopped (or 1/2 tablespoon dried rosemary)

1 teaspoon fresh thyme, chopped (or 1/2 teaspoon dried thyme)

1 cup beef broth

2 tablespoons flour (rice flour for gluten-free)

1 teaspoon dijon mustard (optional)

1 tablespoon Worcestershire sauce

2 teaspoons black pepper, coarsely ground

salt to taste


Instructions:

Season the roast with salt and pepper to taste, place it in the slow cooker, top with the onions, garlic, rosemary, thyme, and broth and cook on low for 8-10 hours.

Remove the roast from the slow cooker and set aside.

Skim 4 tablespoons of the fat from the juices in the slow cooker and heat it in a saucepan over medium heat, sprinkle in the flour and cook until lightly golden brown, add the remaining liquid from the slow cooker along with

Deep Dish Apple Crisp

by

Delicious Apple Pie with Cinnamon Sugar Topping

Ingredients

For the Apple Base:

Peel and slice enough apples to cover the bottom of an 8-inch pie plate

For the Topping:

2 eggs

1 cup sugar (reserve ¼ cup and add 1 teaspoon cinnamon to it)

2 tablespoons melted butter or margarine

1 cup all-purpose flour

1 teaspoon baking powder

1 teaspoon vanilla

Preparation

Step 1: Prepare the Apples

Peel and slice enough apples to cover the bottom of an 8-inch pie plate.


Step 2: Prepare the Topping

In a mixing bowl, combine all topping ingredients except for the reserved cinnamon sugar. Mix well until the ingredients are thoroughly combined.


Step 3: Assemble the Pie

Sprinkle the reserved cinnamon sugar mixture over the sliced apples in the pie plate. Pour the topping mixture evenly over the apples.


Step 4: Bake the Pie

Preheat your oven to 350°F (175°C). Bake the pie for 40-45 minutes or until the topping is firm and golden brown.


Step 5: Enjoy!

Allow the pie to cool slightly before serving. Don’t forget to share this delicious treat with family and friends. Enjoy!


Baked Cream Cheese Spaghetti Recipe

by


 You probably have everything you need to make this baked spaghetti with cream cheese in your pantry right now. This can be made ahead of time and baked when you are ready. I love these kind of dishes. The pasta is really creamy and wonderful


Ingredients


12 ounces spaghetti

1 pound lean ground beef

1 (28 ounce) jar spaghetti sauce

1 (8 ounce) package cream cheese, softened

1 clove garlic, minced

1 teaspoon Italian seasoning

1 pinch garlic salt

½ cup grated Parmesan cheese

½ cup shredded mozzarella cheese

How to Make Baked  Cream Cheese Spaghetti Recipe

Preheat the oven to 350 degrees F (175 degrees C). Lightly grease a 9×13-inch baking pan.

Bring a large pot of lightly salted water to a boil. Cook spaghetti in the boiling water, stirring occasionally, until tender yet firm to the bite, about 12 minutes.

Meanwhile, heat a skillet over medium-high heat. Cook and stir ground beef in the hot skillet until browned and crumbly, 5 to 7 minutes. Drain fat and stir in spaghetti sauce.

Drain spaghetti and place in a bowl. Add cream cheese, garlic, Italian seasoning, and garlic salt. Stir until cream cheese is melted and spaghetti is thoroughly coated. Spread a small amount of meat sauce in the bottom of the prepared baking pan; put spaghetti on top and top with remaining meat sauce. Sprinkle Parmesan and mozzarella cheeses on top.

Bake in the preheated oven until bubbly, about 30 minutes.

Tuesday, November 26, 2024

Pineapple Cream Cheese Pie

by


Ingredients

For the Crust:

1 1/2 cups graham cracker crumbs


1/4 cup granulated sugar


1/2 cup melted butter


For the Cream Cheese Filling:

2 (8-ounce) packages cream cheese, softened


1 cup granulated sugar


1 teaspoon vanilla extract


2 large eggs


1/4 cup sour cream


For the Pineapple Topping:

1 can (20 ounces) crushed pineapple, drained


1/2 cup granulated sugar


1 tablespoon cornstarch


1/4 cup water


1/2 teaspoon vanilla extract


For the Garnish:

1/4 cup toasted coconut flakes


1/4 cup chopped pecans


White chocolate drizzle (optional)


Instructions

Step 1: Prepare the Crust

Preheat the Oven:


Preheat your oven to 350°F (175°C).


Make the Crust:


In a medium bowl, mix the graham cracker crumbs, sugar, and melted butter until well combined.


Press the mixture firmly into the bottom of a 9-inch springform pan.


Bake for 8-10 minutes until lightly browned. Let it cool completely.


Step 2: Prepare the Cream Cheese Filling

Mix the Filling:


In a large bowl, beat the softened cream cheese until smooth. Add the sugar and vanilla extract, mixing w


Add the eggs one at a time, beating well after each addition. Stir in the sour cream.


Bake the Filling:


Pour the cream cheese mixture over the cooled crust.


Bake for 45-50 minutes or until the center is set and the top is lightly browned. Let it cool completely, then refrigerate for at least 4 hours or overnight.


Step 3: Prepare the Pineapple Topping

Cook the Pineapple Mixture:


In a medium saucepan, combine the drained pineapple, sugar, cornstarch, and water.


Cook over medium heat, stirring constantly, until the mixture thickens and becomes clear. Remove from heat and stir in the vanilla extract.


Let the pineapple mixture cool completely.


Step 4: Assemble the Pie

Add the Topping:


Spread the cooled pineapple mixture evenly over the chilled cream cheese filling.


Garnish:


Sprinkle the toasted coconut flakes and chopped pecans over the pineapple topping.


Drizzle with melted white chocolate if desired.


Serve:


Slice and serve this tropical delight chilled. Enjoy the refreshing and creamy flavors of the pineapple cream cheese pie.


Tips for Best Results

Ensure Cream Cheese is Softened: Softened cream cheese blends smoothly, preventing lumps in the filling.


Drain Pineapple Well: Make sure to drain the pineapple thoroughly to avoid a watery topping.


Chill the Pie Completely: Chilling the pie allows the flavors to meld and the texture to set perfectly.


Conclusion

This pineapple cream cheese pie is a delightful combination of creamy, sweet, and tropical flavors.


The crunchy crust, smooth cream cheese filling, and refreshing pineapple topping make it a perfect dessert for any occasion.


Garnished with toasted coconut and pecans, this pie not only tastes heavenly but also looks stunning on any dessert table.

Top Ad 728x90